
Easy DIY Gem & Rainbow Coloured Wood Slices for Loose Parts Play
- Jul 30, 2025
- 4 min read
Updated: Feb 4
These are such simple & beautiful loose parts - perfect for play and learning!

Loose parts for play don't need to be really fancy. These simple wood slices were so simple to make colourful and will be able to used for many different types of play!
These could be used for stacking, building, for small world play, for decorating loose parts printables, for pretend cooking, role-play + so much more. The possibilities with loose parts are endless!
The inspiration for these comes from a photo I saw on Pinterest that had painted wood slices with acrylic paints to use for colour matching (there was no proper credit attached to the photo unfortunately). I chose to use watercolour paints for this project instead. If you only apply a light coat of the watercolours the wood grain will still show through.
We left the underneath side of our wood slices natural to make them more versatile. This means when my kids are playing they can choose to have the natural side up or the rainbow side depending on what they are creating/playing.
*Important: Please note small parts are recommended for children ages 3+ as they can pose a choking hazard. All play and craft was supervised by an adult. It is your responsibility to determine the suitability of this idea/activity for your child/ren. Always inspect your loose parts for damage before play/creating and remove any broken pieces.
Here's how we made our new loose parts ...
List of Materials
Large natural wood slices 4 pack* from Bunnings Australia (found in the craft aisle) or make your own
Natural wood slice 30 pack* from Bunnings Australia (also found in the craft aisle) or make your own
Paint brushes
Tray to paint on or other cloth/paper to protect surfaces
Water in a small container and mini water spray bottle (optional)
Watercolour paints - we used Micador palette (36 colours + metallic 8 disc watercolour palette) and one from IKEA Mala watercolour*
*These are not affiliate links - just linked to help you.
For the gem wood slices you will need:
Gems - ours were from Spotlight Australia in the art/craft section
Hot glue gun + glue sticks

Step 1: Let’s Get Started
Put down your tray or cloth/paper to protect the table. Grab all the needed materials + some water ready to paint. Lay out your chosen wood slices onto the prepared surface/tray.
Step 2: Let's Paint!
Using the watercolour paints paint a thin layer of your chosen water colour paints onto the surface of the wood slices. We chose to do rainbow colours.

Step 3: Leave to dry
Leave your painted wood slices to dry. This shouldn't take long.
*Tip: You may need to do a couple of coats of the watercolour paint to achieve your desired look.

For the gem wood slices
Using the hot glue gun (glue gun recommended to be used by adults only), carefully add a blob of glue into the centre of the wood slices and place the chosen gem onto the glue (be careful not to touch the hot glue) . Hold in place for 20 seconds to help it stick on properly.
Leave to dry. Repeat for the other gems.

Here is our finished wood slices below - all ready for creating some loose parts transient art, or for using in small world play or other play.
I think they turned out pretty! What do you think?

Another fun DIY idea using the wood slices - Fairy Toadstool Stepping Stones!
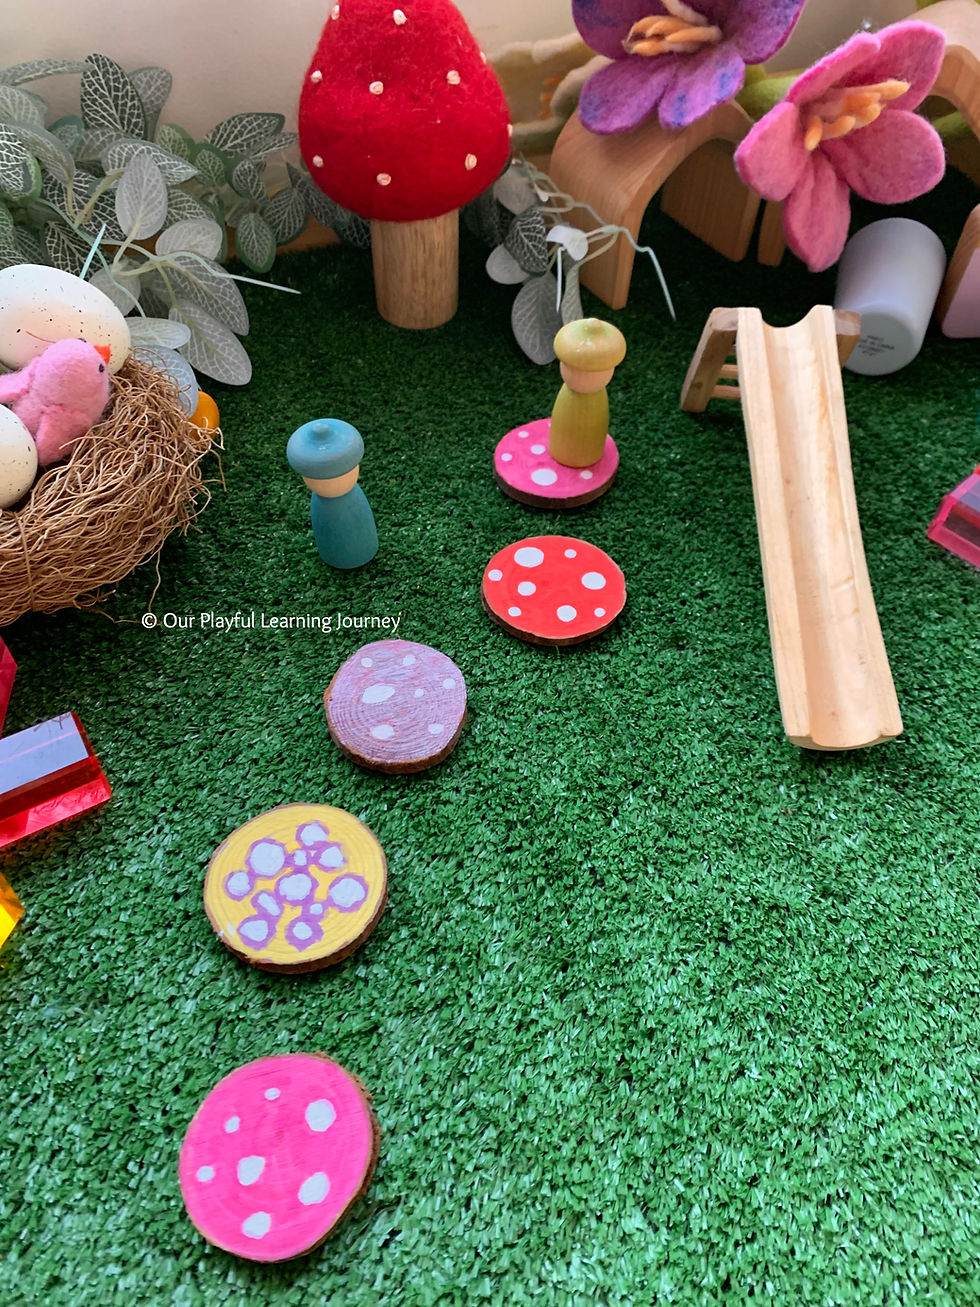
Turn some of your wooden slices into little fairy toadstool stepping stones by drawing on some spots with a white paint pen or using some white acrylic paint. These are such a cute addition to small world play. My two eldest daughters enjoyed painting some of their own as shown above!
These are inspired by the Instagram account @the_bees_knees_adelaide who made a red toadstool DIY version of these with larger & thicker wood slices that look so beautiful in all kinds of play set ups! She also made some with flowers drawn onto them that look amazing too!

DIY Rainbow Wood Slices for Loose Parts Play
This is such a simple DIY that is easy to get your kids involved with. Pick some beautiful colours and enjoy some quiet time painting. It would be the perfect activity to do together with your children on a weekend or in the holidays.
If you know someone else who would enjoy making these (for their classroom or home) - please share this blog post with them!
We will share some of the ways we have been using these soon over on my Instagram page - come and follow along if you aren't already: @our.playful.learning.journey
Let's create a kinder world ...
✨one playful, mindful & creative moment at a time✨
Danica 🩷

For more play and learning ideas visit the homepage here
SAVE this idea for later - PIN ME now!


Comments